

Simple Red Epic / Scarlet and Red One Avid Workflow
- May 31, 2018
- 5 min read
Red has a reputation for having a difficult, tricky or expensive workflow This post will show one of the many ways to simplify it. It's based around cheap and accessible tools so everyone should be able to make use of it. For this example I'm using a 2012 Macbook Pro, the free version of Davinci Resolve 11 and two cheap external drives. The first external drives holds your original Red footage and the second drive will hold your Avid ready footage. With this model of Macbook the processing is done in half real-time. i.e. 15 minutes of footage will be ready to edit within around 30 minutes. Step 1. Setup the drive which will hold your Avid ready footage:

Avid uses a database located in an Avid MediaFiles folder. Inside that folder is a sub folder called MXF, and inside that is a folder (or folders 1-99) named '1'. Your transcoded; ready to edit footage will be placed in here. Step 2. Create a Davinci Resolve Project

Resolve 11 is perfect for our task. It may seem daunting at first but it's very simple to use after a few minutes. It's based on 4 different rooms. Media (as above, for selecting which files you want to work with) Edit (for storing different timelines) Color (for altering the picture if you need to) Deliver (for setting up your transcode options) Everything works from left to right so you should be able to navigate your steps simply. The majority of this post deals with setting up your project. Once you have done it once you can use it as a template as there are very few steps for transcoding the footage. PROJECT SETTINGS

The latest version of Resolve has GPU Red Debayering. Don't worry too much about this. What it does is allow you to deal with Red footage quicker. If you have an NVIDIA GPU make sure it's set to CUDA RAW SETTINGS

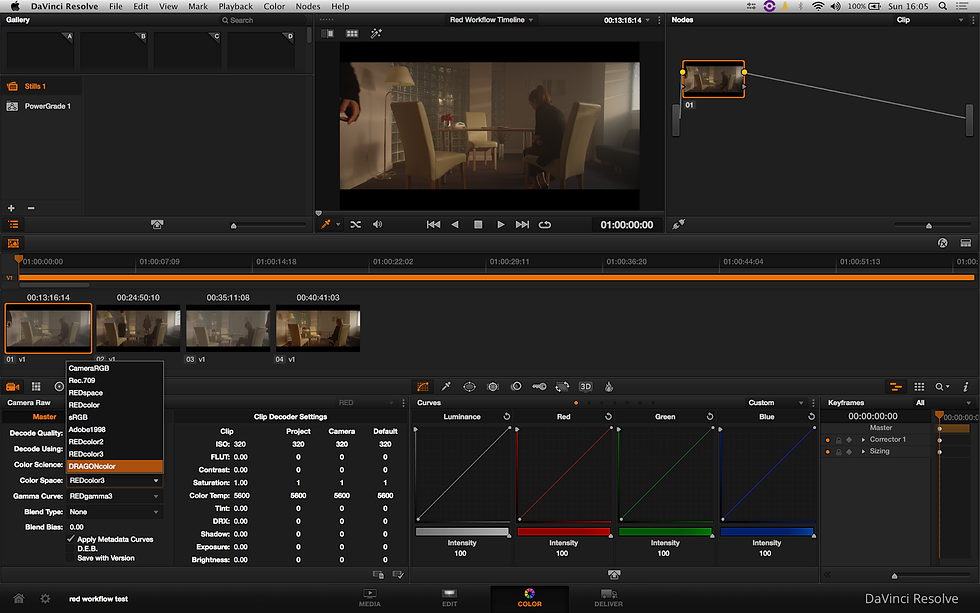
You must let Resolve know how you want it to deal with Red Footage. Our important setting here is the 'Decode Quality'. Half Res. Good is a high quality, quick decode from your 5K Red file. MORE PROJECT SETTINGS!

This looks complicated, but it's very simple really. Most options are set to a standard and you don't need to tweak much else. What you do need to change is your timeline speed. It's 24 as standard so set it to 25, and Playback to 25. That's all you need to touch in Timeline. For video monitoring you only need to select your video monitoring. I've set it to 25 PSF. You can change video depth to 8 bit to speed things up. CONFORM OPTIONS

This is a little complicated but for our purposes just make sure the above are ticked (they are not as standard). Different projects may require different settings. Essentially it helps your Avid workflow by adding some metadata. Don't think too much about it for this. And that is Resolve Set-Up to deal with Red. Every other time you use it you can work from the steps below: Now you just need to load in your footage. Everything from now on will be a left to right process, starting with your Media Room.
MEDIA ROOM - Loading in Footage

In the Media Room, in the top left is your Library. This is where you navigate to where your footage is. We will be loading in Roll B008 to transcode for our example.

In the Media Pool at the bottom left is where you set up your folders. You can drag straight into the Master folder but if dealing with a lot of footage and Rolls it is simpler to use good project management and name your folders to match. Drag the folder from the library into your media pool and you will now have footage loaded into Resolve! EDIT - Creating Your Timeline

This next room is where you create your timelines. This is for larger projects and is down to your own personal project management settings. I normally have different timelines for days but each project is different. For our guide we will just create one. As you can see above - create new timeline. I would then rename to something suitable - Red Workflow Test. Adding Clips to Your Timeline

Click on the Media Pool tab to the right of Timeline (in the top left screen). Your clips will appear underneath. Select and add (by right clicking) and they will now appear in your timeline. For our example this is all you have to do on this screen. COLOR
In a grading session this is where you would make all your tweaks. We won't do much here. But there is a very useful Raw setting where you can change colorspace. This is very handy for other workflows, or whether you go back to your Raw footage later. Using Raw settings here is very useful as they do not take up any processor time, unlike color wheel etc tweaking. This is all we will do here. And onto the transcoding part. DELIVERY

This final room is where the costly mistakes are made. In order to be able to relink our transcodes to original files later we need to tick an important box here. TICK 'INDIVIDUAL SOURCE CLIPS'. If you don't, rather than exporting the four clips individually, they will be one big clip. Useful for some purposes but not for this workflow. This is where you also select your codec for your transcodes. There are many, many different ones with many different purposes. For our Avid workflow we will select MXF and DNxHD 1080p 36 8-Bit

We also need to tick 'USE SOURCE FILENAME'. Otherwise the clip names will be different from our originals and very difficult to relink later. And lastly we need to tell Resolve where to output the transcoded clips. We want to put them in the Shuttle Drive AvidMedia Files folder (see Step 1). We're nearly there! SELECTING WHICH CLIPS TO TRANSCODE

You can either highlight individual clips, right click an in or out point or 'right click' on the orange bar above V1 video track. This will give you an option for 'Select All' which does not seem to appear otherwise. Final Resolve Steps

Now we know the codec, where the clips are being transcoded to and which clips we wish to transcode. All that is left to do is click 'Add job To Render Queue on mid left. And 'Start Render' on Mid right. Your 5K Red Footage is now being transcoded to editable Avid files, and in the correct folder! The 2012 Macbook Pro takes around 30 minutes to render 15 minutes of footage. Pretty fast. Newer desktops with more GPUs will render much faster. All we need to do now is to bring the clips into Avid. And luckily this can be VERY fast. These are Avid Files on your Drive, the ones you just transcoded!

Open an Avid Project with matching resolution and frame rate (1080p 25FPS), Create a bin and in FINDER navigate to your AvidMedia Files folder (the one above).

To Get Your Avid Files into Avid, Drag the .mdb file into an empty bin.
In an instant flash your Red footage is ready to be edited.

There are many ways to deal with Red Footage but hopefully this simple way will be useful for smaller projects.


Comments